
Overview
What Are Soil Nails?
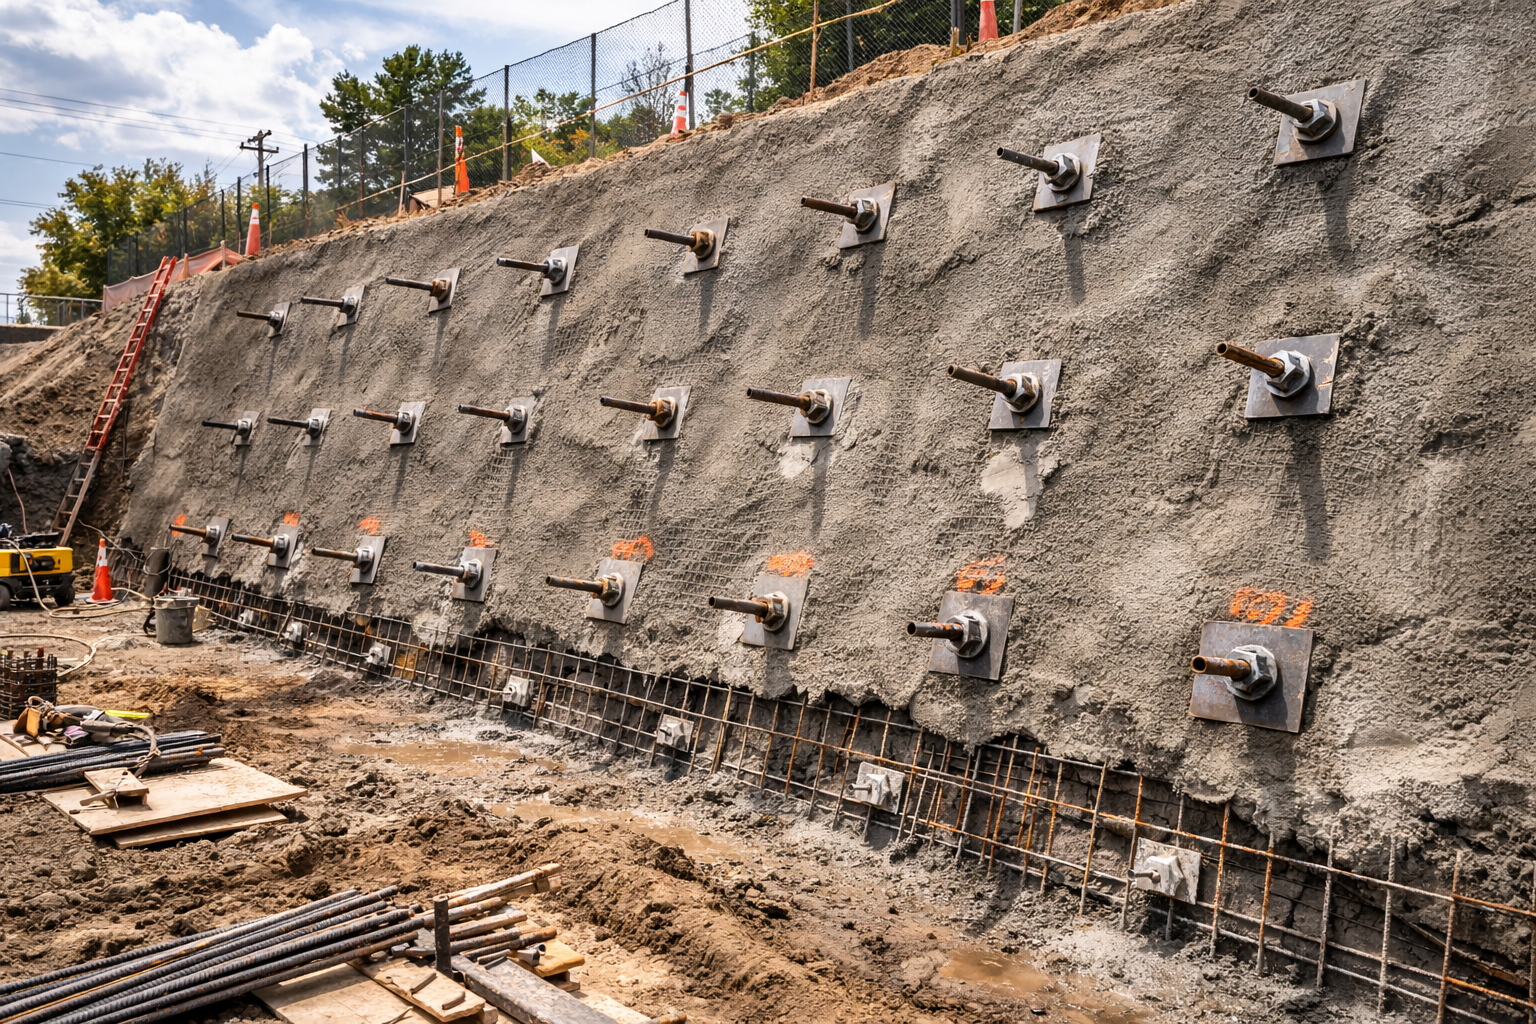
Soil nailing is a ground reinforcement technique used to stabilize excavation faces, cut slopes, and existing retaining structures. Steel bars (nails) are drilled and grouted into the soil at designed angles and spacing, then connected to a structural facing — typically reinforced shotcrete — to create a gravity-resisting block of reinforced earth.
Rocky Mountain Micropiles installs drilled and grouted soil nail systems for commercial excavation support, highway cut slopes, landslide stabilization, and existing wall reinforcement. Our crews drill, grout, and place nails from the top of the excavation downward as the contractor cuts in lifts — keeping pace with the excavation schedule without requiring temporary shoring.
Every soil nail wall we build is designed to meet or exceed FHWA (Federal Highway Administration) guidelines and IBC requirements, with pull-out testing available to verify bond capacity on critical projects.
Technical Data
Soil Nail Specifications
Key technical parameters for our drilled and grouted soil nail systems. Actual design values are project-specific and determined by geotechnical analysis and wall geometry.
Small-diameter drill holes minimize disturbance to the surrounding soil mass during installation, maintaining slope stability throughout the construction sequence.
Nail lengths are designed to extend beyond the critical failure plane, typically 60–80% of the wall height. Lengths exceeding 60 feet are achievable for tall walls.
Nails are typically installed at 10°–20° below horizontal to facilitate gravity grouting. Inclination is adjusted based on soil conditions and wall geometry.
Threaded steel bars (typically Grade 75 ksi) are selected based on required tensile capacity. Hollow bar and solid bar options available depending on ground conditions.
All designs follow FHWA-NHI-14-007 soil nail wall guidelines and IBC code requirements. Pull-out testing per PTI specifications available on request.
Reinforced shotcrete facing (typically 4″–8″ thick) with welded wire fabric or rebar mat provides structural connection between nails and distributes earth pressure.
Applications
Where Soil Nails Are Used
Soil nail walls are specified by engineers when a project requires excavation support or slope stabilization without the cost and footprint of traditional cantilever or tied-back retaining walls.
Discuss Your ProjectExcavation Support
Temporary and permanent retention for building excavations, parking structures, and below-grade construction in urban and commercial settings.
Highway & Road Cut Slopes
Stabilization of cut slopes along highways, roadways, and rail corridors where right-of-way constraints prevent laying back the slope to a stable angle.
Landslide Repair & Slope Stabilization
Emergency and planned stabilization of failed slopes and active landslide areas. Nails reinforce the soil mass and arrest further movement.
Existing Wall Reinforcement
Strengthening of failing or under-designed retaining walls by drilling nails through the existing structure into the retained soil to add global stability.
Bridge Abutments & Infrastructure
Earth retention for bridge approaches, abutment protection, and utility corridor excavations where soldier pile walls aren’t feasible or cost-effective.
Steep Terrain & Hillside Development
Enabling construction on hillside sites along the Wasatch Front and mountain communities where conventional grading would require excessive earthwork or encroach on neighboring properties.
How It Works
Soil Nail Installation Process
Soil nail walls are built from the top down in lifts, coordinating with the excavation contractor to stabilize each level before digging the next.
Excavate Lift
Contractor excavates a 4’–6′ lift, exposing the cut face. Each lift is limited to maintain temporary face stability.
Drill & Grout Nails
Steel bars are drilled into the face at designed angle and spacing, then gravity-grouted with neat cement grout to bond the nail to the surrounding soil.
Install Drainage
Geocomposite strip drains or weep holes are placed on the face to relieve hydrostatic pressure behind the wall before shotcrete application.
Shotcrete Facing
Reinforced shotcrete is applied over welded wire fabric or rebar mat. Bearing plates and nuts are installed to connect nails to the facing.
Test & Repeat
Pull-out tests verify nail bond capacity. The sequence repeats for each lift until the wall reaches full design height.